If you follow any of the sewing blogs you know by now that the current price of cotton is about to increase significantly. Even the fashion world is about to take a hit as cost of 'the fabric of our lives' heads upward.
The price of cotton is increasing from many complex reasons, including:
1. Restrictions on cottons export by India, the second largest cotton growing country,
2. Stockpiling by China, the largest consumer of cotton,
3. Poor harvest in cotton growing countries such as Uzbekistan, which helped create the shortfall; and
4. Last year’s devastating flood in Pakistan, the fourth largest cotton supplier of the world.
In the last 6 months the price of cotton has increased 50-60% and in December cotton futures hit $1.1980 a pound, officially the highest price since records began back in 1870. That's shortly after the 'cotton famine' of the Civil War sent prices soaring. (I’ll have to admit that I’m a history buff and in the interest of keeping this short I’ll skip the history lesson).
What does this mean for you? Well, I’ve been trying to figure that out myself. I do know that this will affect everything from clothing, to yarns, to fabric and more. Just think about everything that is made with cotton; bath towels, robes, quilts, fabrics, clothing, and now think about paying more for those items.
Being a business owner who has a significant interest in keeping my prices low, I started this research to help me decide how this is going to affect my own business. Some of my initial thoughts are that I may not carry such a wide variety of fabric lines, but I think instead I may focus on a few select designers and try to carry their whole line of fabrics… which some small businesses are already doing. Up to this point I've had the fabric to help supplement or fill in the blanks for those lines.
Cotton is not the only fiber on the market, so I may concentrate more on bringing in bamboo, rayon or some other natural, sustainable fabrics.
I may also increase the number of classes I offer on up-cycling. In the past couple of years so many of us have learned creative ways to ‘make-do’ with what we already have that I think continuing with this trend will be easy. Sometimes all it takes is just a little bit of fabric to make a huge impact on our ‘ready to wear’ clothing items.
What does the future hold? I wish I knew! I do think cotton prices will continue to stay high for the time being. I also think (hope) that U.S. farmers will switch their field from corn to cotton now that there is some serious money in growing cotton. Then as it always done, supply and demand will work its magic and prices will start to decrease and/or plateau. Cotton prices have been so low for so long, that like a rubber band, they were bound to snap. I do think there is a ‘happy medium’ it will just be a matter of finding that sweet spot.
Till then I'll be building up my stash!!

Wednesday, January 19, 2011


Thursday, January 13, 2011
New Classes… Home Ec Series in February
The February class schedule is out and we are totally excited! New this month, we’ve split our classes into groups of similar projects – we’re calling them ‘series’ to help new (and experienced) sewists decide which class to take next! Look for the Home Ec series (more below!), Sewing Clothes, Sewing for Fun (accessories and such), Quilts and the Home and Kids and Teens. Later this year watch for Sewing Green – a series of classes featuring upcycling projects, as well as organic and sustainable materials.
The Home Ec Series is a technique-oriented series of classes that includes our popular Sewing Essentials Class. Sewing Essentials is our intro class – learn your way around a sewing machine (if you’ve never used one) or if you’re returning to sewing after a long break and can’t remember how to wind a bobbin, this is the class for you! Students are welcome to bring along sewing machines from home and we’ll help you get the basics down on your machine. Or use one of ours! And, like, most of our classes, you go home at the end of the night with a finished project – a standard sized pillowcase in some of our funky fabrics!

We’re excited to bring two NEW offerings to the Home Ec series in February. On February 12th, we’ll hold The Pattern Reading Workshop. Come to the session with a pattern and fabric for your project and we’ll go over the basics of reading a pattern and get you started on your project (3 hours, $50.)
On February 23rd we’ll kick off a series of fitted-oriented classes with Full Bust Adjustment I. During this class, learn the basics of altering your pattern to get a great fitted shirt! Students will learn about how commercial patterns are drafted, choosing the correct size and making the changes to ensure a great fit. By the end of the class, we’ll have tissue fitted each pattern and students will be ready to head home and work on a muslin (a practice shirt!) In March we’ll offer Full Bust Adjustment II, which will pick up where FBA I leaves off and walk students through ‘reading their muslin’ – assessing the fit and transferring changes back to the paper pattern. (2 hours and initial consultation, $50.)
Hope to see you in the Home Ec Series! Later this week we’ll unveil new classes from our other class series!
To register for a class, stop by the shop or give us a call 612-827-9550.
The Home Ec Series is a technique-oriented series of classes that includes our popular Sewing Essentials Class. Sewing Essentials is our intro class – learn your way around a sewing machine (if you’ve never used one) or if you’re returning to sewing after a long break and can’t remember how to wind a bobbin, this is the class for you! Students are welcome to bring along sewing machines from home and we’ll help you get the basics down on your machine. Or use one of ours! And, like, most of our classes, you go home at the end of the night with a finished project – a standard sized pillowcase in some of our funky fabrics!

We’re excited to bring two NEW offerings to the Home Ec series in February. On February 12th, we’ll hold The Pattern Reading Workshop. Come to the session with a pattern and fabric for your project and we’ll go over the basics of reading a pattern and get you started on your project (3 hours, $50.)
On February 23rd we’ll kick off a series of fitted-oriented classes with Full Bust Adjustment I. During this class, learn the basics of altering your pattern to get a great fitted shirt! Students will learn about how commercial patterns are drafted, choosing the correct size and making the changes to ensure a great fit. By the end of the class, we’ll have tissue fitted each pattern and students will be ready to head home and work on a muslin (a practice shirt!) In March we’ll offer Full Bust Adjustment II, which will pick up where FBA I leaves off and walk students through ‘reading their muslin’ – assessing the fit and transferring changes back to the paper pattern. (2 hours and initial consultation, $50.)
Hope to see you in the Home Ec Series! Later this week we’ll unveil new classes from our other class series!
To register for a class, stop by the shop or give us a call 612-827-9550.
Sunday, December 19, 2010
It's a dogs life: Take 2
If you read the last post, you'll know that Skilos was not too happy with the argyle jacket I made her. I thought it was okay - but she was not happy with it and made no bones (get it?) about letting me know she was not happy with it!
After enough of her evil glares I finally made another jacket for her - this one is pink with large polk-a-dots - which reminds me of a good case of measles. But as you can see below - she seems to love!
 |
| Skilos wearing her new jacket waiting for the first customer of the day! |
I used a pattern this time AND took her measurements to make sure it would fit. It didn't take me as long to stitch together as the first jacket did. And, in my opinion, it wasn't far off from what I threw together without a pattern.
When I went to go put it on Skilos she looked it over and gave me the OK, by not curling her lips, when I slipped it over her head.
 |
| She likes it! Hey Mikey! She likes it! |
I'm not going to say I spoil her but: 1. She is definitely a Doggy Diva, 2. She doesn't like "home made" looking items and 3. She doesn't like argyle - even if it is pink.
 |
| Skilos napping with her Teddy Bear/Baby |
Thursday, December 16, 2010
It's a dogs life
If you've ever been to Sewtropolis you most likely have met, Skilos the shop dog. Skilos is so good at her job that she has her own facebook fan page AND people ask where she's at if they are not greeted by her right away!
Between greeting people she likes to nap on her mat (custom made by a fan of hers). It's been so cold lately that she has been shivering, so I decided to make her a polar fleece jacket - which turned out super cute - but didn't quite fit her. She didn't seem to mind that people were giggling at how small her jacket was, but as her mom (and sewist) I decided to try to make another one... this time I took her measurements! (I'm not sure if I wanted to admit that - but there it is).
I'll admit, I didn't use a pattern for this jacket, I kind of figured how hard could it be?? Well, it wasn't hard if you just wanted a jacket... but if you are sewing for a Doggy Diva then I say start with a pattern!
Here is the Doggy Diva herself:
 |
| That is not a happy look on her face! |
One thing I noticed when putting on this jacket is that she curls her lips (to indicate she's not too happy with wearing it) every time I put it on her. With the first jacket she didn't once curl her lips. Maybe I should have stuck with that one.
 |
| Is that the evil eye she's giving me? |
Sunday, December 12, 2010
Quick & Easy Gifts
I teased in the latest newsletter that I made napkins, coasters and potholders in less than an hour to give away as gifts this season. Hard to believe I know, but really it's super simple and can be done.
Here is how I made the potholders:

One fat quarter (18" x 22") will make two pot holders.
Cut the fat quarter so that you have two 9" x 18" pieces.

Fold one of the pieces, right sides together, so that you have a 9" x 9" square.

Sew a 1/4" seam down the two sides - leaving the top open.

Cut the batting so that it measures 8 1/2" x 8 1/2".

You are going to insert the batting into the folded piece, the easiest way I found to do this is to lay the batting on top of the sewn piece (which is still wrong side out) and turn the whole thing right side out, as one. It will still take some fussing, but I find it's less then trying to stuff the batting in after turning the fabric piece.

Turn the opening in 1/4" and press.

Now you get to sew! Using a 1/8" seam allowance sew closed the opening first. Now go all the way around the potholder using a 1/8" seam allowance until you are 1/4" away from the first seam you made. Leave your needle in the down position, lift the presser foot and turn the potholder 90 degrees. Use the side of your presser foot as a guide and sew 1/4" away from the first stitches until you get to 1/4" away from the second seam you made. Keep going around and around your potholder this way until you get to the middle.

End your seam by going back and forth in the center to lock your stitches.
The coasters are made the same way, but starting with a 5" x 10" pice of fabric and 4 1/2" x 4 1/2" batting. The napkins were made using a fat quarter cut to 18" x 18" and using the rolled hemmed on either your serger (which is what I used) or your sewing machine, to finish the edges of the napkin.

Enjoy!
Monday, November 29, 2010
Idea file: Mini bloomers from Colette Patterns
Looking for a quick and easy project? We’ve got the perfect answer… these mini bloomers from Colette Patterns! The pattern is available as a free download from Colette and all you need is an hour or two, a yard of fabric, and a couple yards each of elastic and ribbon!
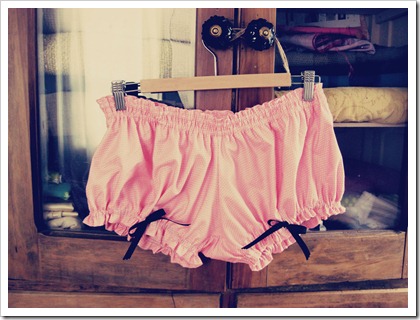
For our version we used Café Dots, a lovely soft cotton from the Oliver + S City Weekend line of fabric for Moda. We think the bloomers would also be perfect in a lovely double gauze or even a fun knit.
There are only two pattern pieces that make up the mini bloomers, making the pattern easy for a beginner. The only ‘special' skills’ required are a passing familiarity with elastic and the buttonhole function on your machine.
The waistband is a clever and elegant application of quarter inch elastic threaded through two simple casings stitched on the folded over waistband. Sizing is super simple – just cut a length of elastic to wrap comfortably around your waist (or use the measurements given on the pattern packaging if you’re making as a gift.)
The leg bands are created by threading a length of ribbon through openings created by sewing a pair of buttonholes on the front of each leg. A quick way to create gathers and a perfect fit.
And there you have it! Sweet and simple bloomers!

For our version we used Café Dots, a lovely soft cotton from the Oliver + S City Weekend line of fabric for Moda. We think the bloomers would also be perfect in a lovely double gauze or even a fun knit.
There are only two pattern pieces that make up the mini bloomers, making the pattern easy for a beginner. The only ‘special' skills’ required are a passing familiarity with elastic and the buttonhole function on your machine.
The waistband is a clever and elegant application of quarter inch elastic threaded through two simple casings stitched on the folded over waistband. Sizing is super simple – just cut a length of elastic to wrap comfortably around your waist (or use the measurements given on the pattern packaging if you’re making as a gift.)
The leg bands are created by threading a length of ribbon through openings created by sewing a pair of buttonholes on the front of each leg. A quick way to create gathers and a perfect fit.
And there you have it! Sweet and simple bloomers!
Friday, November 19, 2010
Quilt Retreat
I like to joke that I've been sewing since I was 9 years old, but stopped when I opened Sewtropolis. I sometimes find myself so busy running my business that I fail to take the time to create (outside of sewing store samples) and after a while I can't resist the urge to create something!
I also made "Trip Around the World" quilt which I am 'hiding' as it will be a Christmas gift for a friend once I get it done. I'll post pictures after the New Year.
 |
| Pieced back with Piano Keys boarder |
Twice a year I get to 'escape' and head up north to Quilt Retreat where spend 3, 4, or sometimes a whole week sewing and quilting with girlfriends. That's where I was over the weekend and I was able to start, and finish up, quite a few projects.
First up is this queen size Batik quilt my son, Drew and I were working on. (Next best thing to sewing with girlfriends is sewing with your kids - especially boys!) The top was complete so I pieced together the back using the left over fabric. When I measured though it wasn't quite large enough so I cut and pieced the smaller leftover pieces to create the piano key boarder. My plan now is to find a place that will allow me to rent a long arm quilting machine.
First up is this queen size Batik quilt my son, Drew and I were working on. (Next best thing to sewing with girlfriends is sewing with your kids - especially boys!) The top was complete so I pieced together the back using the left over fabric. When I measured though it wasn't quite large enough so I cut and pieced the smaller leftover pieces to create the piano key boarder. My plan now is to find a place that will allow me to rent a long arm quilting machine.
 |
| Front |
 |
| fabric bowl |
Once I had two quilts pinned I started in on the smaller projects including this fabric bowl. I made it for "Fat Cat Gimley", but because he'll have it full of hair in no time, I have it at the store until I make another one. I need time to enjoy it before Fat Cat takes it over. (he's 17lbs)
 |
| bottom of bowl |
 |
| Gimley the Fat Cat |
Subscribe to:
Posts (Atom)