Showing posts with label sewing. Show all posts

Wednesday, June 8, 2011

Shelves, Shirt and Serger

In case you missed it, Drew and I finished making the first set of shelves today. It's a good thing he is a math wiz and I know fractions like the back of my hand.  It took a little configuring but we managed to get it together and loaded up with fabric.  
I swear sometimes my neighbors must think I'm a little nuts with the projects I take on around the house, and now I'm sure my neighbors around the shop feel the same way.  For the record, I don't always use a circular saw while wearing a skirt and heels.  
After we got the shelves stocked Drew wanted to start on a sewing project.  He's actually been sewing since he was about 6 and had made about 8-10 quilts. Today though he thought he'd make himself a t-shirt.  

I helped him lay out his fabric, after that he was on his own.  

Cutting out his pieces....

... and once I showed him how to use the serger he was on a roll.  However, once he made a mistake on the serger and saw all the stitches he would have to take out, all the fun stopped.  
He then decided he really didn't want to make a t-shirt anyway and gave it to me to finish.  Which I did, along with a pair of shorts and I now have a nice summer pajama outfit.  Something I needed anyway. 
Drew decided to stick with quilts for now.  I'll show you what he's making once he gets a little further.  

Let's get Ziggy With It

It's so hot outside that we actually broke a few records yesterday, but I am still NOT complaining.  Not that I need an excuse, but I do feel the heat has given me one to stay inside and finish my Ziggy Quilt by Cluck Cluck Sew:  
The last post I showed you how to use the walking foot to "Stitch in the Ditch". Here is a close up of when it worked: 
Can't see any stitches can you?  And here's a picture of when it didn't quite work: 

See those stitches sitting on top of the printed fabric?  Sometimes that happens and I don't stress about it.  I'll drive myself crazy if I do that.
  
One of the things I like to do is stitch the binding on entirely by machine. (I'm very open about the fact that I do very little hand-sewing.) Normally the binding is stitched to the front of the quilt and then fold it to the back.  But because I use my machine I stitch the binding to the back and bring it to the front.  This way I can see where I'm stitching, making sure that everything looks nice.  Something that would be hard to do if I were sewing it from the back.   
It's hard to see in this picture, but I used a zig-zag stitch to stitch the binding down. I will often use a decorative stitch because:  1. I think it looks better and 2. It's a lot easier for me to do then a straight stitch (remember that Stitch in the Ditch gaff above?)
Here's a shot of the back.   
So with this post and the last we covered the Walking Foot, Stitch in the Ditch and Binding.  Who's ready to make this quilt?  Stay tuned because on Friday I'll be giving away enough 5" squares to make this quilt.  Till then try to stay cool!   


Monday, June 6, 2011

This Foot is Made For Walking

Today's weather in Minneapolis was hot and humid!  There was even a heat advisory issued, but so far I haven't heard anyone complaining! We've had such cold, wet weather that this heat is feeling kinda nice.
However, that doesn't mean I wanted to stay out in it too long and since I was going to be inside anyway, I decided to try and finish up this quilt for the store.

This pattern is Ziggy Baby by Cluck Cluck Sew in Amy Butler's Soul Blossom line. To quilt it together I decided to 'Stitch in the Ditch" and to do that I need a Walking Foot.  For those of you who don't know what a Walking Foot is, it looks something like this:

 If you don't have a foot that looks similar to this you should be able to purchase one at your sewing machine dealer.  It's a handy gadget to have, especially if you like to quilt.


Stitching in the Ditch is a term used when you quilt in the seams.  So you can see by this picture that I have my foot/needle lined up on the seam of the solid and polk-a-dot fabrics.  If everything works out just the way I want it you won't be able to see my stitches ..... because they'll be hidden in the seam or the 'ditch'. 


I want to use the walking foot to do this because if I use a regular (universal) foot the feed dogs (teeth like things under your presser foot) will pull the fabric through the machine, while the universal foot will create a drag on top of the project, causing the two fabrics to be fed through the machine at two different rates.  If you are quilting this is especially problematic because your quilt top will shift creating puckers.  (Fun Fact: there is a formula tailors use to account for drag when sewing sleeves and pant legs.  Once figured out they will cut one piece shorter than the other so that by the time they reach the end the two pieces are even)

By using a Walking Foot I can avoid most, if not all, the drag.  The way the Foot works is like this:  the walking foot has a arm that sits on top of the needle bar.  You can see in the picture above that the needle is down, the arm is down and the foot is up off the fabric.
In this picture you can see the needle up, arm is up and the foot is down.  So if you flip between these two pictures you'll see that the foot is literally walking along the project as you sew.  

No drag means no puckers when you get to the end of the rows.  :-)) 

No puckers on top either and by Stitching in the Ditch all my stitches are hidden (well most of them anyway).  Now who's ready to take a walk?   

Friday, March 4, 2011

The Tale of Two Shirts

Recently Colette Patterns released a mans shirt pattern known as Negroni.  Now for those of you who like to sew know that there was a great buzz in the sewing realm at the release of this pattern.  Colette patterns is known for their hip styles and easy instructions, but up until now they had mainly focused on women's fashion, which made the release of this pattern the buzz of the sewing blogs!   


The great thing about sewing is that it's a great way of making something your own.  Patty and I set out to sew the Negroni shirt for the men in our lives (her hubby and my brother).  As you will see we both used the same shirt pattern, but our shirts have turned out very different.  

I made my shirt as a birthday present for my brother who lives in Seattle.  (so mums the word) My brother is a personal assistant by day and a hipster by night.  (modeled by my son who demanded a ride to school as pay)  I chose to use a cotton woven fabric by Joel Dewberry which has a heavier hand (feel to it) and very urban. 

  While Patty made her shirt for her husband who is an accountant and works downtown. (who modeled in exchange for being allowed to play with Lucy the beautiful basset hound).  Patty chose a cotton woven fabric by Oliver+S - has a lighter hand and is more conservative.
We both chose the same pocket style (there were at 3 to choose from), though I chose to use a pearl snap on mine because I thought it added to the 'hipster' look of the shirt.

 while Patty chose to use buttons, which fits in nicely with the conservative look of her shirt. 

We both made the long sleeve version and again I opted to use snaps on the cuffs and top-stitched using a light blue thread. 

While Patty created button holes and used her sewing machine to attach all the buttons (clever girl).
IMG_2699
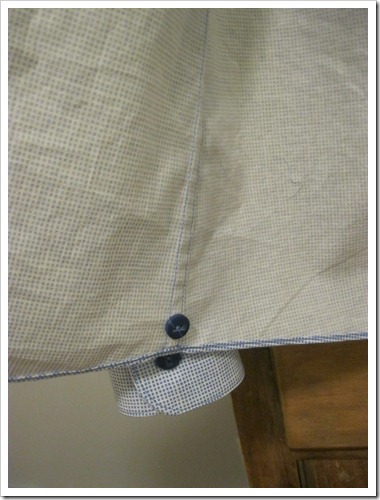
Patty even added a spare button to the inside seam of her shirt - just like ready to wear! (very clever girl)

I chose to use the serger to create a rolled-edge stitch to finish the hem of my shirt.  I did this for a few reason:  1.  It shows off the contrasting blue thread which, I think, adds to the casual look and charm of this shirt.  2.  If my brother chooses to tuck in the shirt it adds a little more length to the finished shirt (my brother has a long torso) and 3.  It was just plain easier!  

Patty chose to hem the bottom of her shirt using a very narrow hem.   

The front of my shirt and the back of Patty's. 

And the back of my shirt and the front of Patty's.  

Two completely different looks using the same shirt pattern.  
*you can read more about Patty's shirt on her snugbug blog and more about my shirt on my hubbahubbadingdong blog. (after March 17 - because this is his birthday gift after all)

Wednesday, September 8, 2010

Is that a challenge? You don't have to tell me twice!

At the end of August I decided to try and challenge myself to wear only the things I make myself (see below). At the time the weather was hot and after sewing a ton of skirts for the summer I was thinking I could slowly add to my wardrobe as the weather got cooler and cooler and be good to go by winter. But then the weather literally changed overnight and I thought “Oh yea – I live in Minnesota!” So instead of starting the challenge September 1st I thought I would make a few things and maybe try the challenge as a New Years Resolution.


Then today one of my customers (Patty with the cute Flippy Skirt) informed me of “Self-Stitched-September” from So-Zo’s blog. www.sozowhatdoyouknow.blogspot.com By the way, did I also mention that I believe that when things present themselves more than once it is a sign that you should sit up and pay attention because someone bigger than yourself is speaking to you? Well I do. Self-Stitched-September was just too close to MY challenge that I can’t just ignore it.  So, given that September IS National Sewing Month, I am going to go ahead and do this challenge. 

I, Nikol Gianopoulos, sign up as a participant of Self-Stitched-September. I endeavour to wear at least one handmade or refashioned items of clothing every day for the duration of September 2010.

I hope a few of you will join me in this challenge. I will post pictures of my creations though out September and who knows -once I'm on a roll I may just decided to go a full year! 

---------------------------------------------

My original post/challenge:

I’m not a very competitive person, but I do like to challenge myself … mainly because when I challenge myself it makes me live with intention. Being a single mom and business owner I often feel like I’m living by default - just reacting to all that is going on around me

I was listening to the radio this past weekend and they interviewed three women who decided not to buy any new clothes for one year. They mainly did it because of the economy and the whole realization that they might have too many clothes in their closets. But I also believe they did it because they wanted to see if they could, which sounded right up my alley.

I started to wonder if I could go a year without buying any new clothes. Probably, since I’m not a big clothes shopper to begin with. But then I though…. I wonder if I could go a year wearing only the things I make. Hmmmm??? Maybe…. I did make a lot of skirts this past summer. But I would need some time to ‘build-up’ my wardrobe. You see, I don’t sew as much as I should or ALL that I could. For example; I’ve never sewn a bra (though I know it can be done) and I haven’t sewn many pants (mainly because they are too hard to fit). I’ve never sewn a coat (but it’s on my list), or a pair of gloves (though I recently bought a pattern). And when I do sew it is mainly store samples or things for other people. I know that if I sewed more I would get better at it. Plus, it would force to become more creative which has always been a running goal of mine.

So, starting September 1 the challenge is:

1. Not to buy any new clothes for one year. Exception: I can buy from the thrift store as long as I repurpose the clothing before wearing.

2. Everyday wear at least one item that I have made or repurposed.

3. Make at least one new item of clothing a week. (My real goal here is to sew a little bit everyday)

I also challenge myself to blog about it once a week since I could really use the writing practice for another challenge I have brewing in the back of my mind, but more on that challenge a little later.

Wish me luck – I’ll keep you posted.