Friday, April 1, 2011

Tutorial: iTouch Pouch

As promised here is the tutorial on how to make a iTouch pouch. 
First, measure your iTouch.  Mine is 4 1/2" x 2 1/2".  If you were doing a iPhone or other type of phone you'd want to take the depth measurement also.  But since the iTouch is pretty flat I didn't bother with that measurement.


For this project you will need:
  • 2 pieces of fabric that measure 7 1/2" x 5 1/2" (one of the inside the other for the outside of the pouch).  
  • 2 pieces of fabric that measure 6 1/2" x 5 1/2" these will be for the pockets.
  • 1 piece of thick interfacing (I used Pellon 70) that measures 7 1/2" x 5 1/2",
  • 1 small hair band or 3" of small piece of elastic; and
  • 1 button.


 Take your two pocket pieces (6 1/2" x 5 1/2") and fold in half so you have two 3 1/4" x 3 1/4".  Press

Top stitch 1/8" from the fold. 


 Lay your interfacing down on the table. 


Now lay your inside fabric right side up ontop of the interfacing. 


Lay the two pocket pieces on top of the inside fabric so that the folds are facing one another.  
Line up the raw edges.  
Next take the rubber band or elastic piece and lay it in the middle of one of the shorter ends so that the loop lays to the inside.  (I taped mine down instead of pinning to avoid a big 'pin bump'')


Next lay the outside piece face down on-top of your pile. 

Pin everything to hold in place.

Stitch starting on one long end 2 inches away from the edge.  
Now sew all the way around the pouch stopping 3" away from where you started.  (You will be turning your project inside out through this opening so you'll want to leave plenty of space to do that.)

Clip your corners so that everything will lay nice and flat once you get it turned right-side out.  Once it's turned right-side out press it flat with your iron.  

Top stitch 1/8" away from the edge, going all the way around.  This will not only give your pouch a nice finished look, but it closes up that opening so you won't have to do it by hand. 

Sew your button on by hand to the side of the pouch opposite from where the elastic is.
Voila!  A pretty pouch to hold your iTouch, phone or if you make it a little smaller it will hold business cards, gift cards etc. 
Have fun and post what you make on our flicker page.

Wednesday, March 9, 2011

Pajama Bottoms using a Border Fabric

If you are like me you are in love with Amy Butler’s Soul Blossom line of fabric.  Two of my favorites are these border prints:

AB57RASPBERRY AB57MOSS

When I first saw this fabric I thought it would make a cute skirt – which I still think it will.  But I also envisioned a cute pair of pajama bottoms! 

pajama3  pajama1 The ‘trick’ to making these is to open up your fabric and refold so that the border prints are on each end.  

pajama2 I made the pants to fit me so I ended up shorting the pattern piece so that I could get each pattern piece to fit all the way onto the new fabric layout (44”) .  Which then made these a cute pair of capri style pajama pants and perfect for the warmer weather we are bound to get soon!

We are offering a Pajama Bottom class on Saturday, March 19 from 6-9p call the store if you’d like to learn how to make your own border print pajama bottoms. 

Friday, March 4, 2011

The Tale of Two Shirts

Recently Colette Patterns released a mans shirt pattern known as Negroni.  Now for those of you who like to sew know that there was a great buzz in the sewing realm at the release of this pattern.  Colette patterns is known for their hip styles and easy instructions, but up until now they had mainly focused on women's fashion, which made the release of this pattern the buzz of the sewing blogs!   


The great thing about sewing is that it's a great way of making something your own.  Patty and I set out to sew the Negroni shirt for the men in our lives (her hubby and my brother).  As you will see we both used the same shirt pattern, but our shirts have turned out very different.  

I made my shirt as a birthday present for my brother who lives in Seattle.  (so mums the word) My brother is a personal assistant by day and a hipster by night.  (modeled by my son who demanded a ride to school as pay)  I chose to use a cotton woven fabric by Joel Dewberry which has a heavier hand (feel to it) and very urban. 

  While Patty made her shirt for her husband who is an accountant and works downtown. (who modeled in exchange for being allowed to play with Lucy the beautiful basset hound).  Patty chose a cotton woven fabric by Oliver+S - has a lighter hand and is more conservative.
We both chose the same pocket style (there were at 3 to choose from), though I chose to use a pearl snap on mine because I thought it added to the 'hipster' look of the shirt.

 while Patty chose to use buttons, which fits in nicely with the conservative look of her shirt. 

We both made the long sleeve version and again I opted to use snaps on the cuffs and top-stitched using a light blue thread. 

While Patty created button holes and used her sewing machine to attach all the buttons (clever girl).
IMG_2699
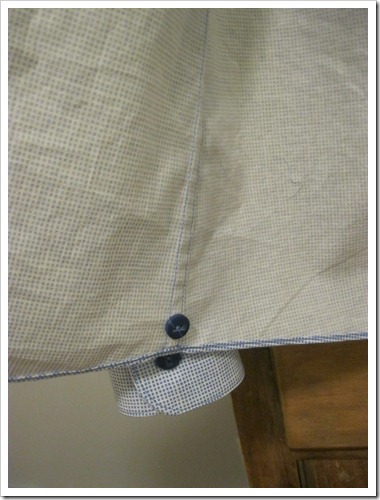
Patty even added a spare button to the inside seam of her shirt - just like ready to wear! (very clever girl)

I chose to use the serger to create a rolled-edge stitch to finish the hem of my shirt.  I did this for a few reason:  1.  It shows off the contrasting blue thread which, I think, adds to the casual look and charm of this shirt.  2.  If my brother chooses to tuck in the shirt it adds a little more length to the finished shirt (my brother has a long torso) and 3.  It was just plain easier!  

Patty chose to hem the bottom of her shirt using a very narrow hem.   

The front of my shirt and the back of Patty's. 

And the back of my shirt and the front of Patty's.  

Two completely different looks using the same shirt pattern.  
*you can read more about Patty's shirt on her snugbug blog and more about my shirt on my hubbahubbadingdong blog. (after March 17 - because this is his birthday gift after all)

Tuesday, February 22, 2011

Coming in like a lion–classes next week at Sewtropolis!

Whew! As everyone digs out from the last storm, we’re gearing up for spring with our March classes! Check out these classes – all happening the very first week of March!

March 1st – Perfect Wrap Dress

We’ll kick off the month with the Perfect Wrap dress – perfect for Spring! This super flattering dress is easy to make (no zippers or buttons!) and is as comfy as it is cute. The class is two parts, so make sure to get registered and make it to both sessions. We’ve graded the class as a level 3 – it’s perfect for students who’ve taken Sewing Essentials and one of our level 2 classes (apron? pajama bottoms?) and are looking for the next project. The class is taught by Patty – here she is modeling her version in a lovely double gauze from Echino.


March 2nd – Sewing Essentials

Dying to make the wrap dress, but can’t remember how to wind your bobbin? Sewing Essentials is perfect for you! Half the class is devoted to a full review of the sewing machine including threading, bobbin winding, cleaning and oiling. During the second half of the class we’ll put your new knowledge to practice and make some funky pillowcases that fit a standard size pillow. Great for beginners or those who want to brush up rusty skills. Bring your machine so you’ll know what to do when you get back home, or use one of ours.

March 3rd - Hostess Apron

OK, we’re all about spring, but Mother’s Day and Father’s Day will be here before you know it! Take our Hostess Apron class and get your gifts ready early. Make mom’s from this gorgeous fleur de lis cotton and make dad a barbeque-ready from this woodsy cotton laminate – both fabrics from the Kate Spain Central Park line from Moda. This is a level two class – so if you’ve graduated from Sewing Essentials, you’re ready to tackle the Hostess (or Host) Apron!
One Yard fabric Central Park by Kate Spain   Coated Fabric by Central Park designed by Kate Spain

March 5th – Quillow

At the end of the week we’ll hold the Quillow class… what’s a quillow you ask? Half quilt, half pillow, this level two class is perfect for beginner sewers who’ve taken the Sewing Essentials class and are looking for a fun project to sew for kids. We’ll be using Valori Wells’ Blissful Turnaround pattern.

March 5th – Pincushion of the Month Club

Rrrawr! This month’s pincushion of the month club features lion and lamb pincushions! These simple and adorable pincushions are almost too cute to stick a pin in! Learn how to play with a bit of yarn to make a mane or some wooly fleece and have fun making faces out of buttons! Workshops are open to all levels and last for one hour where we’ll go over the specific techniques for the month’s pincushion. Kits are available for an extra fee with all the materials to make a lion and lamb of your own and your class fee includes two hours of Q&A Studio Time to use anytime during the month of March – the perfect amount of time to make a lion and lamb of your own!
lion

Registration and materials.

Whew! That’s a lot going on in one week! To register, call the shop (612-827-9550) during business hours – Tuesday through Saturday 10 a.m. to 6 p.m. and Sundays noon to 4 p.m. In most cases, materials are not included in class fees. We offer a 10% discount on materials purchased at the shop for a class.

See you next week!

Tuesday, February 15, 2011

What's Black and White and Soon To Be Swapped!

The Minneapolis Modern Quilters are doing a swap and challenge on Thursday, I recently blogged about the challenge if you'd like to read 'the rules'. I have so much fabric in my stash that I thought I would use up what I had. Unfortunately once I started cutting into it I discovered that the 1/4yard cuts I had were cut 9"x44" and not fat quarters which are 18"x 22". Normally this wouldn't be a problem, but the rules say that the fabric has to be washed.... which then made it fray.  I then ended up getting only 4 strips instead of the 6 I needed from each of my scraps - which means I was 'forced' to use this beautiful fabric we have at the store called Dilly Dally by Me and My Sister.

Squaring up fabric straight off the bolt is a whole lot easier then squaring up fabric once it's been washed.  Here's how I squared up the fabric after I washed it. 

I folded my fabric matching up the selvages first.  I then folded it in half again. 
All wrinkles should be smoothed out.

I then lined up the vertical lines on my ruler with the folded edge. 

I cut off just the frayed edges of the fabric. (waste not, want not)

If you're ambidextrous you should be able to make the next cut without flipping the fabric.  But since most of us aren't ambidextrous I flipped the fabric.  I then measured in 3" with my ruler and cut my first strip.  If you are cutting more than one strip you will repeat this step for as many strips as you need. 

If you did this right, when you open your strip it should be straight and not wavy.

I'll be taking the top fabric and the bottom fabric for the exchange.  But I'll also be bringing the two in the middle as extras - because we're allowed to do that.  :-)

In case you didn't read the post about the exchange, everyone is welcome to come to the meeting.  It starts at 6:30 and goes till 8.  Bring a Fat Quarter if you'd like to be entered in the fat quarter drawing.

Saturday, February 5, 2011

Do-It-Green Workshop - Repurposed Sweater Tutorial

If you missed out on today's Do-It-Green upcycling, repurposing and clothing swap at the store you'll be happy to know that there was such a good turnout that I'm sure we'll be doing it again soon. 

At the workshop I promised to blog about how I turned a old out of fashion sweater into a sweater that I'll actually wear!  (which is the whole purpose behind repurposing).  

Supplies you will need:
old sweater
thread
scissors
pins
sewing machine or serger

Before we begin, here is the before picture of me wearing a sweater that is in no way, shape or form flattering on me at all.

Lay your sweater out on a flat surface and start cutting!  

First, start with the sleeves, you can either leave them long or short or do what I did and make them 3/4 length.  This is your sweater make it work for you!  

Next if your sweater has a turtle neck like mine you can either leave it or cut it off.  I chose to cut mine off because I plan on wearing this sweater in the Spring when the weather turns warmer.  If you decide to leave the neck intact, you'll cut right through it in the next step. 

Next I made a cut about 3" - 4" off center to the left from hem to neck.  If you decided to cut the neck off - this is where you'll do it.
You're now ready to sew it all back together.

Once again, starting with the sleeves I used the serger to finish the edges.  You don't have to use a serger - a simple zigzag on a conventional machine will work. 

 I then serged (or zigzaged) around the bottom edge, up one side of the front, around the neck, and down the other side.  Doing this will ensure a nice 'finished' look for your sweater. 
Next, pin the two front edges together - with the insides t ouching.  Now stitch (serge or zigzag) starting at the bottom edge of the sweater, working your way towards the neck and stopping about 4" - 6"  from the neck line.  (Where you stop will depend on how low a cut you are comfortable with - again this is your sweater - make it work for you)!

Here is my "after" sweater - now this is something I will wear! 
Thanks again to everyone who attended the Do-It-Green workshop. 
For a tutorial on how to make leg warmers out of a wool sweater check out my personal blog.


Friday, February 4, 2011

Minneapolis Modern Quilters February Challenge

Hi all,
The Minneapolis Modern Quilters are putting together a new Swap and Challenge for February.  If you don't know what a swap and challenge is let me explain it to you.  Everyone brings the pre-determined fabric requirements to the meeting (in this case it's two or more fat quarters that "read" Black, White or Gray.  We all swap our fabric with one another so that everyone ends up with a bit of everyone else's fabric.  We then go home and make something. 


The cool thing about this group is - it doesn't have to be a quilt.  We did a swap and challenge last year - exchanging strips of polka-dot fabric.  What was so cool  was that even though we all walked away with the same fabrics we all created entirely different items!  I created this strip quilt. 

You can see what the other members made by visiting our Flickr site.  

If you love quilting this group is a great group to get involved in.  What is super neat about it is that most are on-line in one way shape or form.  There are a few that have blogs (see sites below) and are very active on-line.  I have really, really loved getting to know this group of women, they are all so creative!  I really encourage everyone who even dreams of quilting to come to a meeting and see for yourself.  

In the meantime here are the rules for the Februray swap.  Hope to see you soon! 

SWAP
Start with two (or more) fat quarters that "read" BLACK, WHITE or GRAY. Print should be in these colors, too. No solids, please.

Wash fabrics.
Cut into strips that are 3 inches wide/ 20 inches long. You should end up with 5-6 strips per fat quarter.

We are swapping 10 strips - 5 from two fabrics. If you submit more, you may duplicate fabrics. (Each swapper will use at least two different fat quarters!) - You will get the same number of strips that you swap.

The swap will happen at the February meeting. If you are unable to be there, but want to swap, please send Elise Peters a email (elisepeters@mac.com) and she will send you her mailing address.  If you choose to participate this way you must send a return envelope and postage. All mail in strips should be received by Tuesday, February 15th.

CHALLENGE
Once you have received your swapped strips, add one additional SOLID fabric to finish the "top" of your project. (You may add others for your backing and binding!)

There are lots of ideas for black and white quilting projects on flickr!

Complete your top for the May meeting.

If you have questions about this swap-challenge, let me know! We are hoping to get at least 12 participants, but more would be great! 

Want to check out the group at:  https://www.bigtent.com/groups/modquilt 
Other members of the Group who are also blogging about this project are:
Marie @ http://craftymsp.blogspot.com/
Annik @ http://www.minimushrooms.blogspot.com/
Karen @ http://www.badlandsquilts.com/

Nikol @ http://hubbahubbadingdong.blogspot.com/