I've decided to try hosting my own Word Press blog on the Sewtropolis website. So far so good, but I can't seem to transfer all my followers. Boo! I knew there would be a chance I might not be able to do that so I'm hoping you will all make the move on your own. To entice you a little bit I'm doing a giveaway for enough fabric to make the Ziggy Quilt top.
Visit the new site at http://sewtropolis.com/blog/ to see how you can enter. (it's really easy)

Friday, June 10, 2011
Wednesday, June 8, 2011
Shelves, Shirt and Serger
In case you missed it, Drew and I finished making the first set of shelves today. It's a good thing he is a math wiz and I know fractions like the back of my hand. It took a little configuring but we managed to get it together and loaded up with fabric.

I swear sometimes my neighbors must think I'm a little nuts with the projects I take on around the house, and now I'm sure my neighbors around the shop feel the same way. For the record, I don't always use a circular saw while wearing a skirt and heels.
After we got the shelves stocked Drew wanted to start on a sewing project. He's actually been sewing since he was about 6 and had made about 8-10 quilts. Today though he thought he'd make himself a t-shirt.

I helped him lay out his fabric, after that he was on his own.

Cutting out his pieces....

... and once I showed him how to use the serger he was on a roll. However, once he made a mistake on the serger and saw all the stitches he would have to take out, all the fun stopped.
He then decided he really didn't want to make a t-shirt anyway and gave it to me to finish. Which I did, along with a pair of shorts and I now have a nice summer pajama outfit. Something I needed anyway.
Drew decided to stick with quilts for now. I'll show you what he's making once he gets a little further.
Let's get Ziggy With It
It's so hot outside that we actually broke a few records yesterday, but I am still NOT complaining. Not that I need an excuse, but I do feel the heat has given me one to stay inside and finish my Ziggy Quilt by Cluck Cluck Sew:

The last post I showed you how to use the walking foot to "Stitch in the Ditch". Here is a close up of when it worked:

Can't see any stitches can you? And here's a picture of when it didn't quite work:
See those stitches sitting on top of the printed fabric? Sometimes that happens and I don't stress about it. I'll drive myself crazy if I do that.
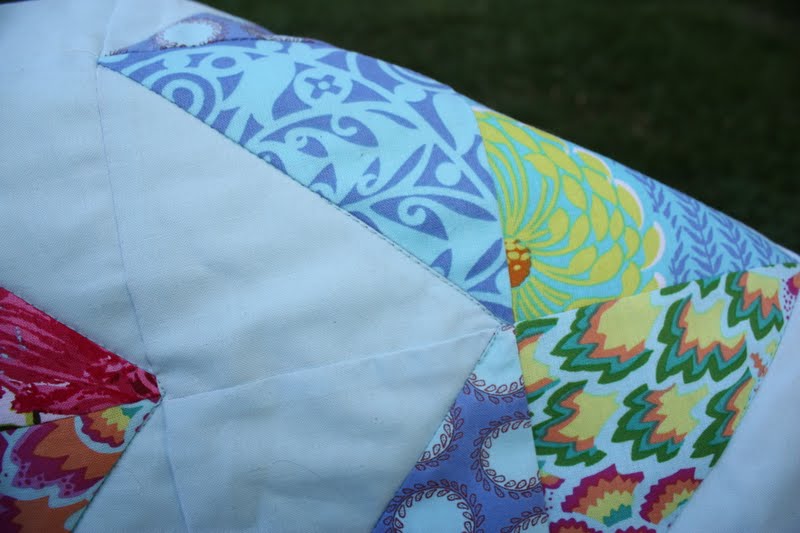
One of the things I like to do is stitch the binding on entirely by machine. (I'm very open about the fact that I do very little hand-sewing.) Normally the binding is stitched to the front of the quilt and then fold it to the back. But because I use my machine I stitch the binding to the back and bring it to the front. This way I can see where I'm stitching, making sure that everything looks nice. Something that would be hard to do if I were sewing it from the back.

It's hard to see in this picture, but I used a zig-zag stitch to stitch the binding down. I will often use a decorative stitch because: 1. I think it looks better and 2. It's a lot easier for me to do then a straight stitch (remember that Stitch in the Ditch gaff above?)
Here's a shot of the back.

So with this post and the last we covered the Walking Foot, Stitch in the Ditch and Binding. Who's ready to make this quilt? Stay tuned because on Friday I'll be giving away enough 5" squares to make this quilt. Till then try to stay cool!
Monday, June 6, 2011
This Foot is Made For Walking
Today's weather in Minneapolis was hot and humid! There was even a heat advisory issued, but so far I haven't heard anyone complaining! We've had such cold, wet weather that this heat is feeling kinda nice.
However, that doesn't mean I wanted to stay out in it too long and since I was going to be inside anyway, I decided to try and finish up this quilt for the store.

 If you don't have a foot that looks similar to this you should be able to purchase one at your sewing machine dealer. It's a handy gadget to have, especially if you like to quilt.


I want to use the walking foot to do this because if I use a regular (universal) foot the feed dogs (teeth like things under your presser foot) will pull the fabric through the machine, while the universal foot will create a drag on top of the project, causing the two fabrics to be fed through the machine at two different rates. If you are quilting this is especially problematic because your quilt top will shift creating puckers. (Fun Fact: there is a formula tailors use to account for drag when sewing sleeves and pant legs. Once figured out they will cut one piece shorter than the other so that by the time they reach the end the two pieces are even)

By using a Walking Foot I can avoid most, if not all, the drag. The way the Foot works is like this: the walking foot has a arm that sits on top of the needle bar. You can see in the picture above that the needle is down, the arm is down and the foot is up off the fabric.


However, that doesn't mean I wanted to stay out in it too long and since I was going to be inside anyway, I decided to try and finish up this quilt for the store.

This pattern is Ziggy Baby by Cluck Cluck Sew in Amy Butler's Soul Blossom line. To quilt it together I decided to 'Stitch in the Ditch" and to do that I need a Walking Foot. For those of you who don't know what a Walking Foot is, it looks something like this:


Stitching in the Ditch is a term used when you quilt in the seams. So you can see by this picture that I have my foot/needle lined up on the seam of the solid and polk-a-dot fabrics. If everything works out just the way I want it you won't be able to see my stitches ..... because they'll be hidden in the seam or the 'ditch'.


I want to use the walking foot to do this because if I use a regular (universal) foot the feed dogs (teeth like things under your presser foot) will pull the fabric through the machine, while the universal foot will create a drag on top of the project, causing the two fabrics to be fed through the machine at two different rates. If you are quilting this is especially problematic because your quilt top will shift creating puckers. (Fun Fact: there is a formula tailors use to account for drag when sewing sleeves and pant legs. Once figured out they will cut one piece shorter than the other so that by the time they reach the end the two pieces are even)

By using a Walking Foot I can avoid most, if not all, the drag. The way the Foot works is like this: the walking foot has a arm that sits on top of the needle bar. You can see in the picture above that the needle is down, the arm is down and the foot is up off the fabric.

In this picture you can see the needle up, arm is up and the foot is down. So if you flip between these two pictures you'll see that the foot is literally walking along the project as you sew.

No drag means no puckers when you get to the end of the rows. :-))

No puckers on top either and by Stitching in the Ditch all my stitches are hidden (well most of them anyway). Now who's ready to take a walk?
Monday, May 16, 2011
Going Around in a Circle Skirt
As you know May is our Month of Skirts and we've been having fun teaching people how to make all kinds of skirts. Patty taught the wrap skirt and Laura taught the Study Hall skirt and both blogged before hand about what you'll learn should you take the class.

I, on the other hand, made the Circle Skirt:

If you want to know about the techniques you'll learn in class just go back and visit some of my latest blogs. For example - did you see my tutorial on making a rolled hem using a rolled foot on your sewing machine? I did this tutorial after hemming my circle skirt using this technique. It's honestly not hard, but if you don't have a rolled hemmed foot for your machine we can talk about other ways to hem your skirt during the class.
Also, did you see my tutorial on how to make bias binding? No, you won't be making bias binding for your skirt, but there are parts of the skirt that are cut on the bias - which has stretch (and why bias binding works so well for curved seams) and why you won't want to hem the skirt until after you've allowed it to hang for at least 24 hours.
After completing the Circle Skirt sample I've had customers who weren't able to take the class, purchase one-on-one time with us to have us walk them through their own skirt and we are more than happy to do that for you too!
Give us a call at the store if you'd like to sign up for the Circle Skirt class on Wednesday, May 18, 6-9p. 612-827-9550.
If you can't make the class, and think you may need some help, then give us a call to schedule some one-on-one time.
If you've been sewing for a while and are inspired to make the Circle skirt on your own, then I hope the tutorials have helped.
No matter the route you take to complete your skirt we hope you'll post a picture of your Circle Skirt on our Flickr site.
A final word on our new hours:
Monday - Saturday: 11-7p
Sunday: Noon - 5p
Come see us soon!
Thanks!
Thursday, May 5, 2011
How to Make Bias Binding
We get quite a few people in the store looking for bias binding. We used to carry it, but we always seemed to stock the wrong colors and I would end up either giving a quick demonstration on how to make your own binding, using the method below, or referring them to the 'big box' store that everyone seems to dread going to.
Making your own bias binding is not difficult and the benefits far outweigh the time it takes to make it. It's less expensive AND there's no matching colors and settling for 'close enough' when what you really want is something with some 'cute' factor in it.
There are many ways to make bias binding, but this way seemed to be the easiest for me. So without further ado, here is how I make bias binding:
Start with a piece of fabric, I used a fat quarter for demonstration purposes.
 |
| Lay your fabric out on your work surface. |
 |
| Take the upper left corner (A) and fold it down till it is even with bottom edge (B) |
 |
| Now take the bottom left corner (C) and fold it up towards the top edge (D) |
 |
| C & D will now become E |
 |
| Take the left corner (F) to meet the top (E) |
 |
| Fold down any extra fabric (wrapping it around the folded piece if necessary) till you have a nice neat rectangle. |
 |
| View from the folded end. All folds should line up one on top of the other. |
 |
| You are now going to square up the fabric using your rotary cutter and ruler. |
 |
| Being sure to use your ruler so that the cut will be on the true bias. |
 |
| Once everything is squared up cut off just the folds. (about 1/4") |
 |
| Now using your ruler line up your bias strips. |
 |
| I like mine 2 1/2" wide so this is were I'll make all my cuts. |
 |
| I'll cut down the full length of fabric - I can always use the extra bias strips. |
 |
| Now we sew these all together. I like to sew mine on the bias. I've marked my stitch line. |
 |
| Sometimes you luck out and the strips will line up. Here I'll sew in 1/4". Note the corners extending 1/4". You'll want to be sure to have this so that when you open the strip everything lines up perfect. |
 |
| All the strips sewn together. |
 |
| Press the seam to one side. |
 |
| Make the binding by folding the strip in half lengthwise. |
 |
| When you sew your strips on the bias, you avoid the seam stacking, which reduces the bulk when sewing. |

 |
| You can now add your binding to any project. |
Tuesday, May 3, 2011
Introducing Sewaholic Patterns!
May is the Month of Skirts here at Sewtropolis and we’re kicking it off with the introduction of a new pattern line at the shop: Sewaholic Patterns from Vancouver-based designer, Tasia Pona. We recently ‘sat down’ (okay, we emailed…) with Tasia to learn a bit more about her… read on and check back in after the interview to learn more about our our special Sewaholic offer!

[designer Tasia Pona models the Pendrell blouse, pattern available at Sewtropolis]
Tell us about Sewaholic Patterns! What kind of woman are you designing your patterns for?
Sewaholic Patterns creates pretty, versatile sewing patterns for the pear-shaped women! The styles are designed to fit and flatter a pear-shaped figure, although it's easy to adapt them for any body type. I wanted to make patterns that are easy to sew but fit well, versatile enough to make over and over, and most importantly, flattering and comfortable! The woman in my mind likes to look feminine and pretty, pulled-together without looking too fussy or overdressed. She sews because it's the best way to get unique, fashionable clothing that fits right.
OK, now a little about you... answer these questions three...
How did you learn to sew?
I learned to sew from my mother, when I was a little girl. She let me use her fabric scraps for Barbie doll clothes, so that's how I started off my sewing adventures. My Barbie was oh so stylish! She had a suede miniskirt, a cape, all kinds of awesome things that no other Barbie doll had! That's the greatest part about sewing, being able to make exactly what you want, regardless of what's in fashion or in the stores, and get it to fit you properly. After outfitting Barbie with a wardrobe of great items, I moved on to sewing for myself. In high school I took sewing (every year!) and afterwards, I went on to college and completely my degree in Fashion Design. So I've been sewing nearly all my life!
What's your favorite style of skirt?
I love all kinds of skirts, but my favorite is a full gathered or pleated skirt. I like my skirts to be comfortable and flattering, and I find pleated or gathered styles have the best of both worlds! Pockets are a must, and I like them roomy and functional. I do also love circle skirts, anything that floats out when you twirl around is good in my books! Bonus points for petticoats and contrasting linings. Whatever style of skirt you prefer, skirts should be feminine, flattering, and fun to wear!
What's on your sewing table right now?
The Crescent Skirt, for the Sew-Along! I'm making it up in a pretty red cotton print, and I'm still looking for the perfect bright turquoise for a coordinating slip. I do have a few other projects on the go, including a Vintage Vogue dress from the early fifties in teal wool. I found the most amazing vintage glass button to finish off the dress.
What can we expect to see from Sewaholic this year? Any new patterns on the drafting table?Most definitely, there will be new patterns this year! My goal is to release at least four new patterns this year, to build up the collection. All of the new styles will work together to build a pretty, handmade wardrobe! Dresses, skirts, jackets, trousers - several exciting new designs are in the works!
We heard through the grapevine that we can get some help from the designer while working on our Sewaholic patterns! Tell us about your sewalongs!
What's a sew-along, you might ask? A Sew-Along is like a long-distance sewing meet-up. Like when two friends who live in different cities go see the same movie separately together, and then call each other to talk about it afterwards. It’s like that, but for sewing!
We all sew the same pattern, with our own choice of fabric, and then I’ll post step-by-step photos of the sewing instructions. We’ll sew a little bit every day or so, and the posts will be there for those who work at a more relaxed pace. Everyone who's sewing along can ask me questions along the way if they get stuck, and when it’s all done we each have a pretty, finished project! I also post tips, tutorials, and designer's recommendations - plenty of reasons to stop by and check it out, even if you're not sewing along at the same time.
The great part is that there’s a whole bunch of us doing it together. What I've found from the first Sew-Along is that sewist are generally kind, helpful people. People will comment with their own suggestions and tips, what worked for them, and offer opinions and alternate methods. At the end of it all, we've all learned something new, even the intermediate and advanced sewists! And it's incredibly helpful for beginners to be able to sew with confidence, knowing there's a whole group of people who will help them along the way.
Let’s see the patterns!

The Crescent Skirt
The Crescent skirt is the newest offering from Sewaholic and is a fun and flirty skirt – perfect for summer! With roomy pockets and the option of an above or below the knee length, you can make up a few for the weekends and a few for wearing to work!

The Pendrell Blouse
The Pendrell Blouse was the first release from Sewaholic Patterns and is perfect in one of our summer voiles! This beginner level shirt works on its own or paired with a suit.
Check out the Pendrell sewalong posts for great tips on how to sew up this sweet little blouse!
[View A]


[View B]
Thank you Tasia for taking the time to answer our questions! Check out Tasia’s blog and keep up with new releases by following her Facebook page.
As a special offer* during the “Month of Skirts” come in and pick up a copy of the Crescent skirt and we’ll include two hours of Q & A Studio Time** with your purchase. The Crescent skirt sewalong is currently underway, so you’ll have access to great tips on sewing your skirt! If you get stuck, come on in to use your Q & A Studio Time and get some extra help from one of us. The Crescent Skirt is appropriate for an Advanced Beginner – if you’ve taken one of our level 2 classes such as pajama bottoms or bias cut skirt, this would be a great next pattern for you.
And watch for our June schedule – we’ll be celebrating a Month of Shirts and devoting our full line up to summer blouses! Patty will be teaching the Pendrell shirt on June 20th!
*offer ends May 31st, 2011
** Q&A Studio time is halfway between independent studio time and personal one-on-one instruction and is geared towards sewists who are able to work independently with some assistance from our staff learning new techniques.
Subscribe to:
Posts (Atom)